> ## Documentation Index
> Fetch the complete documentation index at: https://docs.vessl.ai/llms.txt
> Use this file to discover all available pages before exploring further.
# Default resource specs
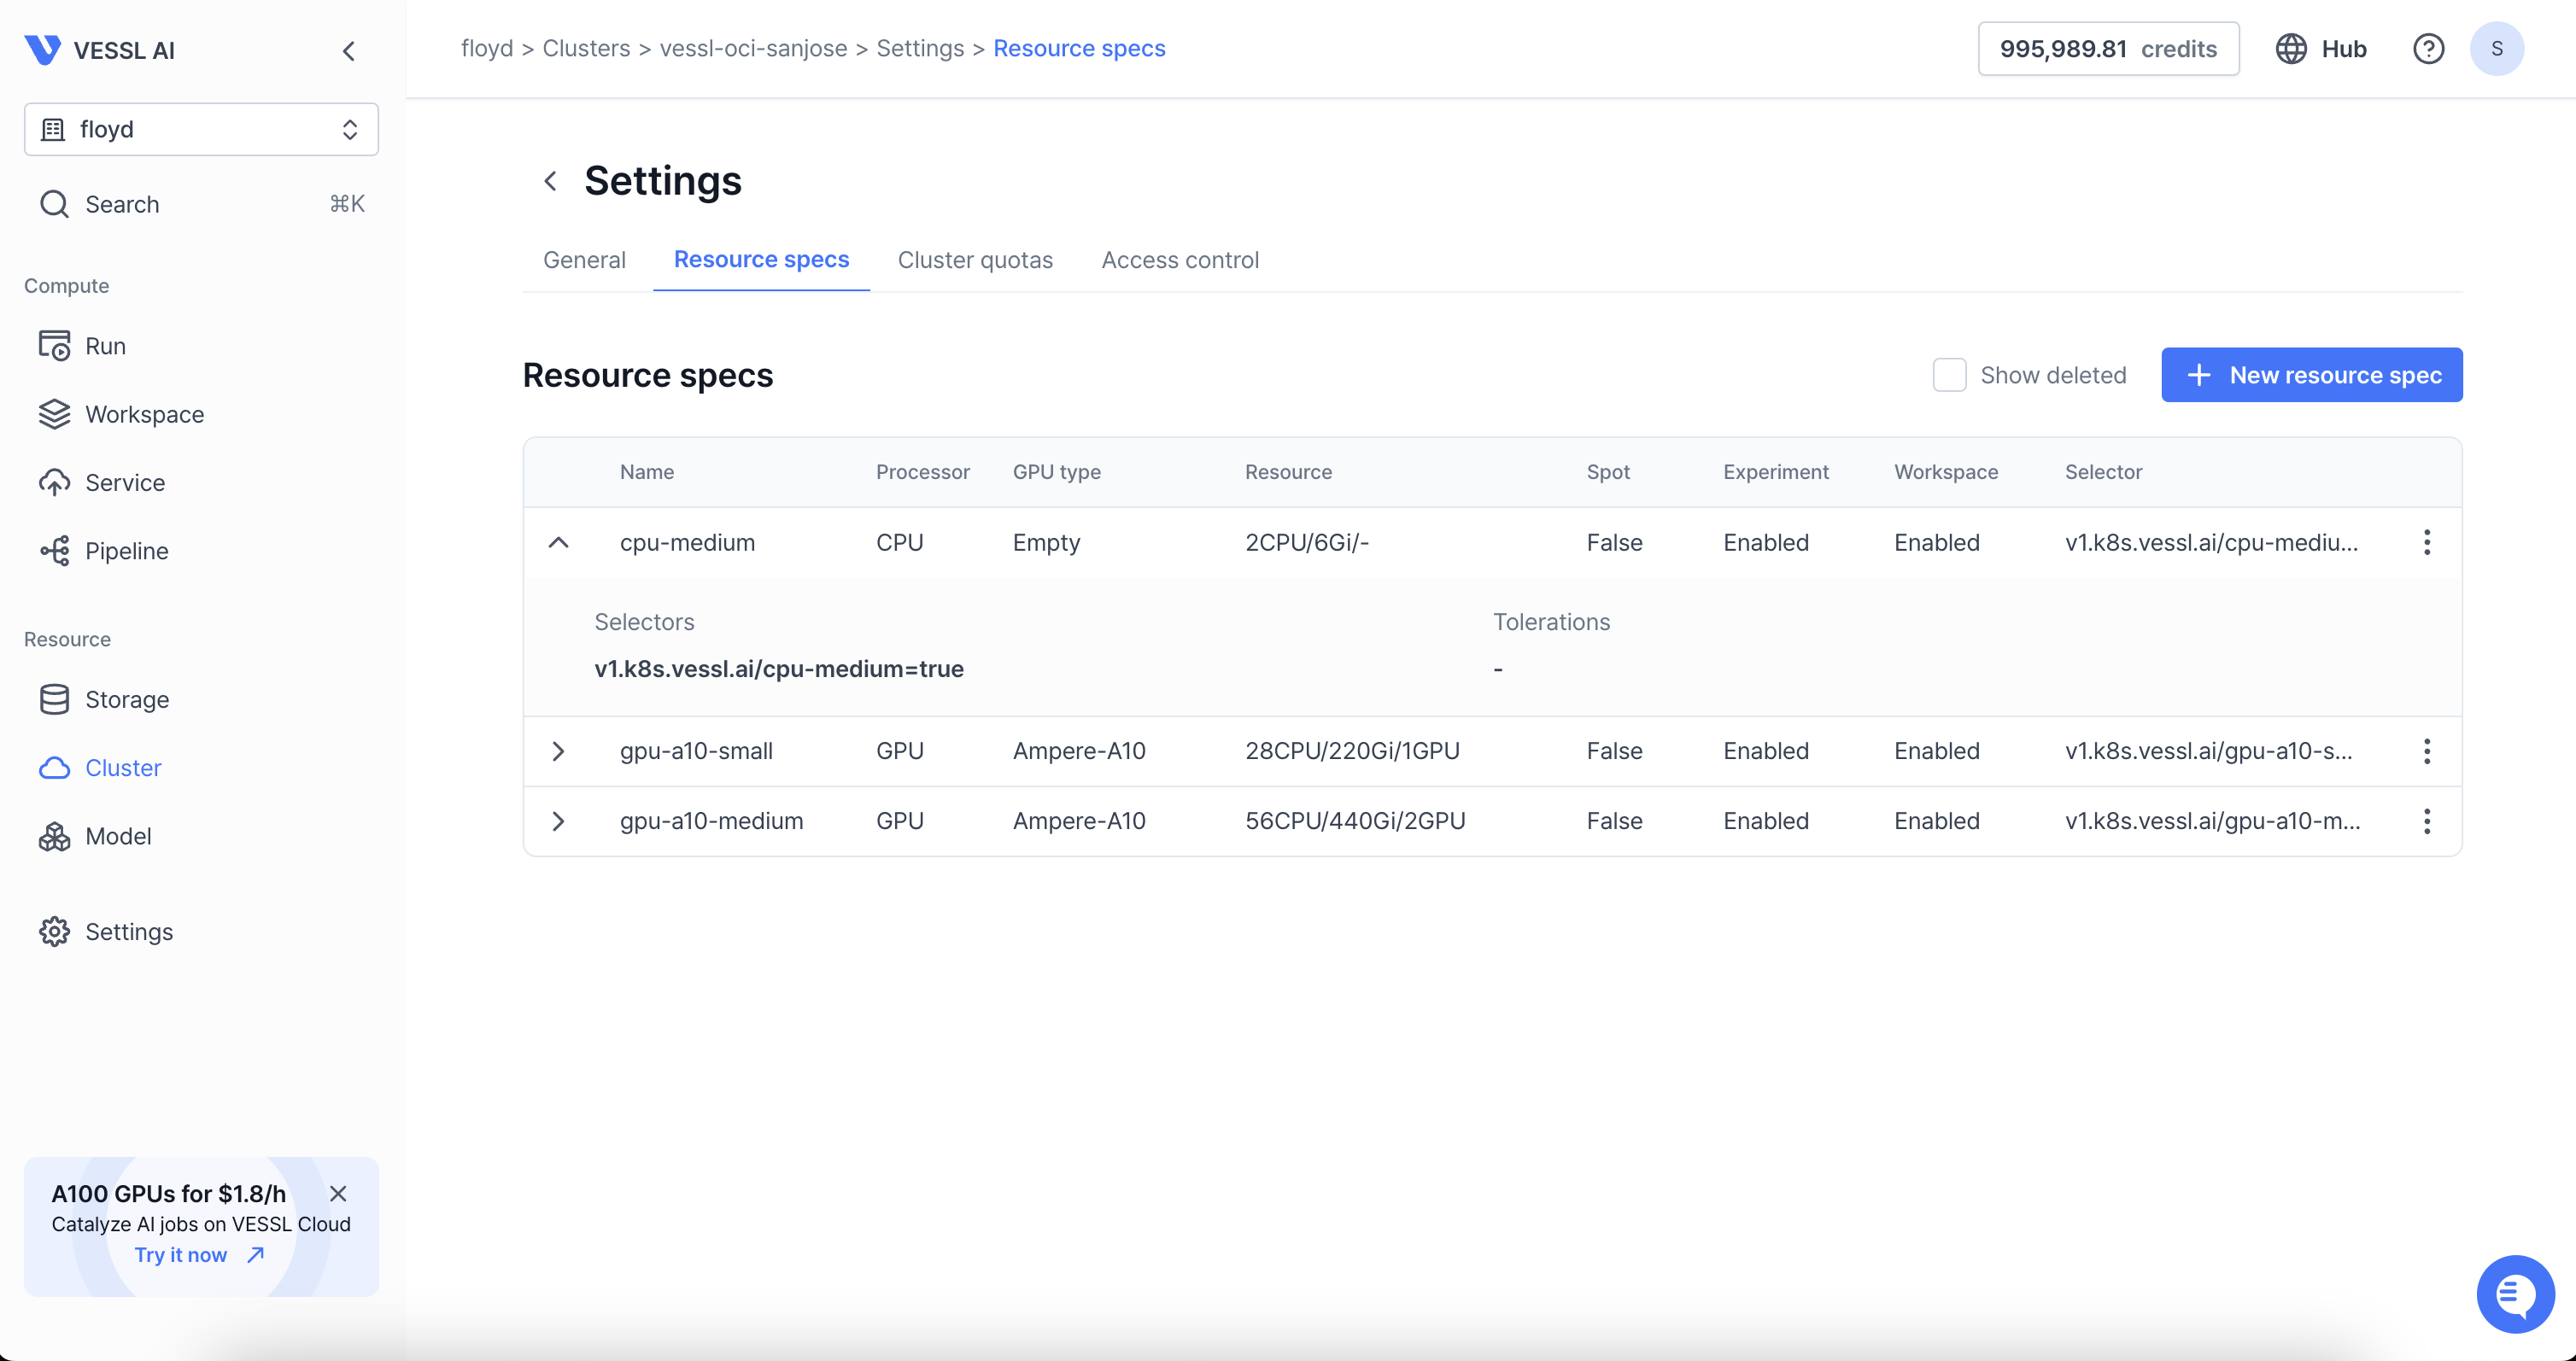 As an organization manager in your firm, you can set custom resource presets under **Resource specs** that users can select when launching ML workloads. Additionally, you can specify the priority of these options.
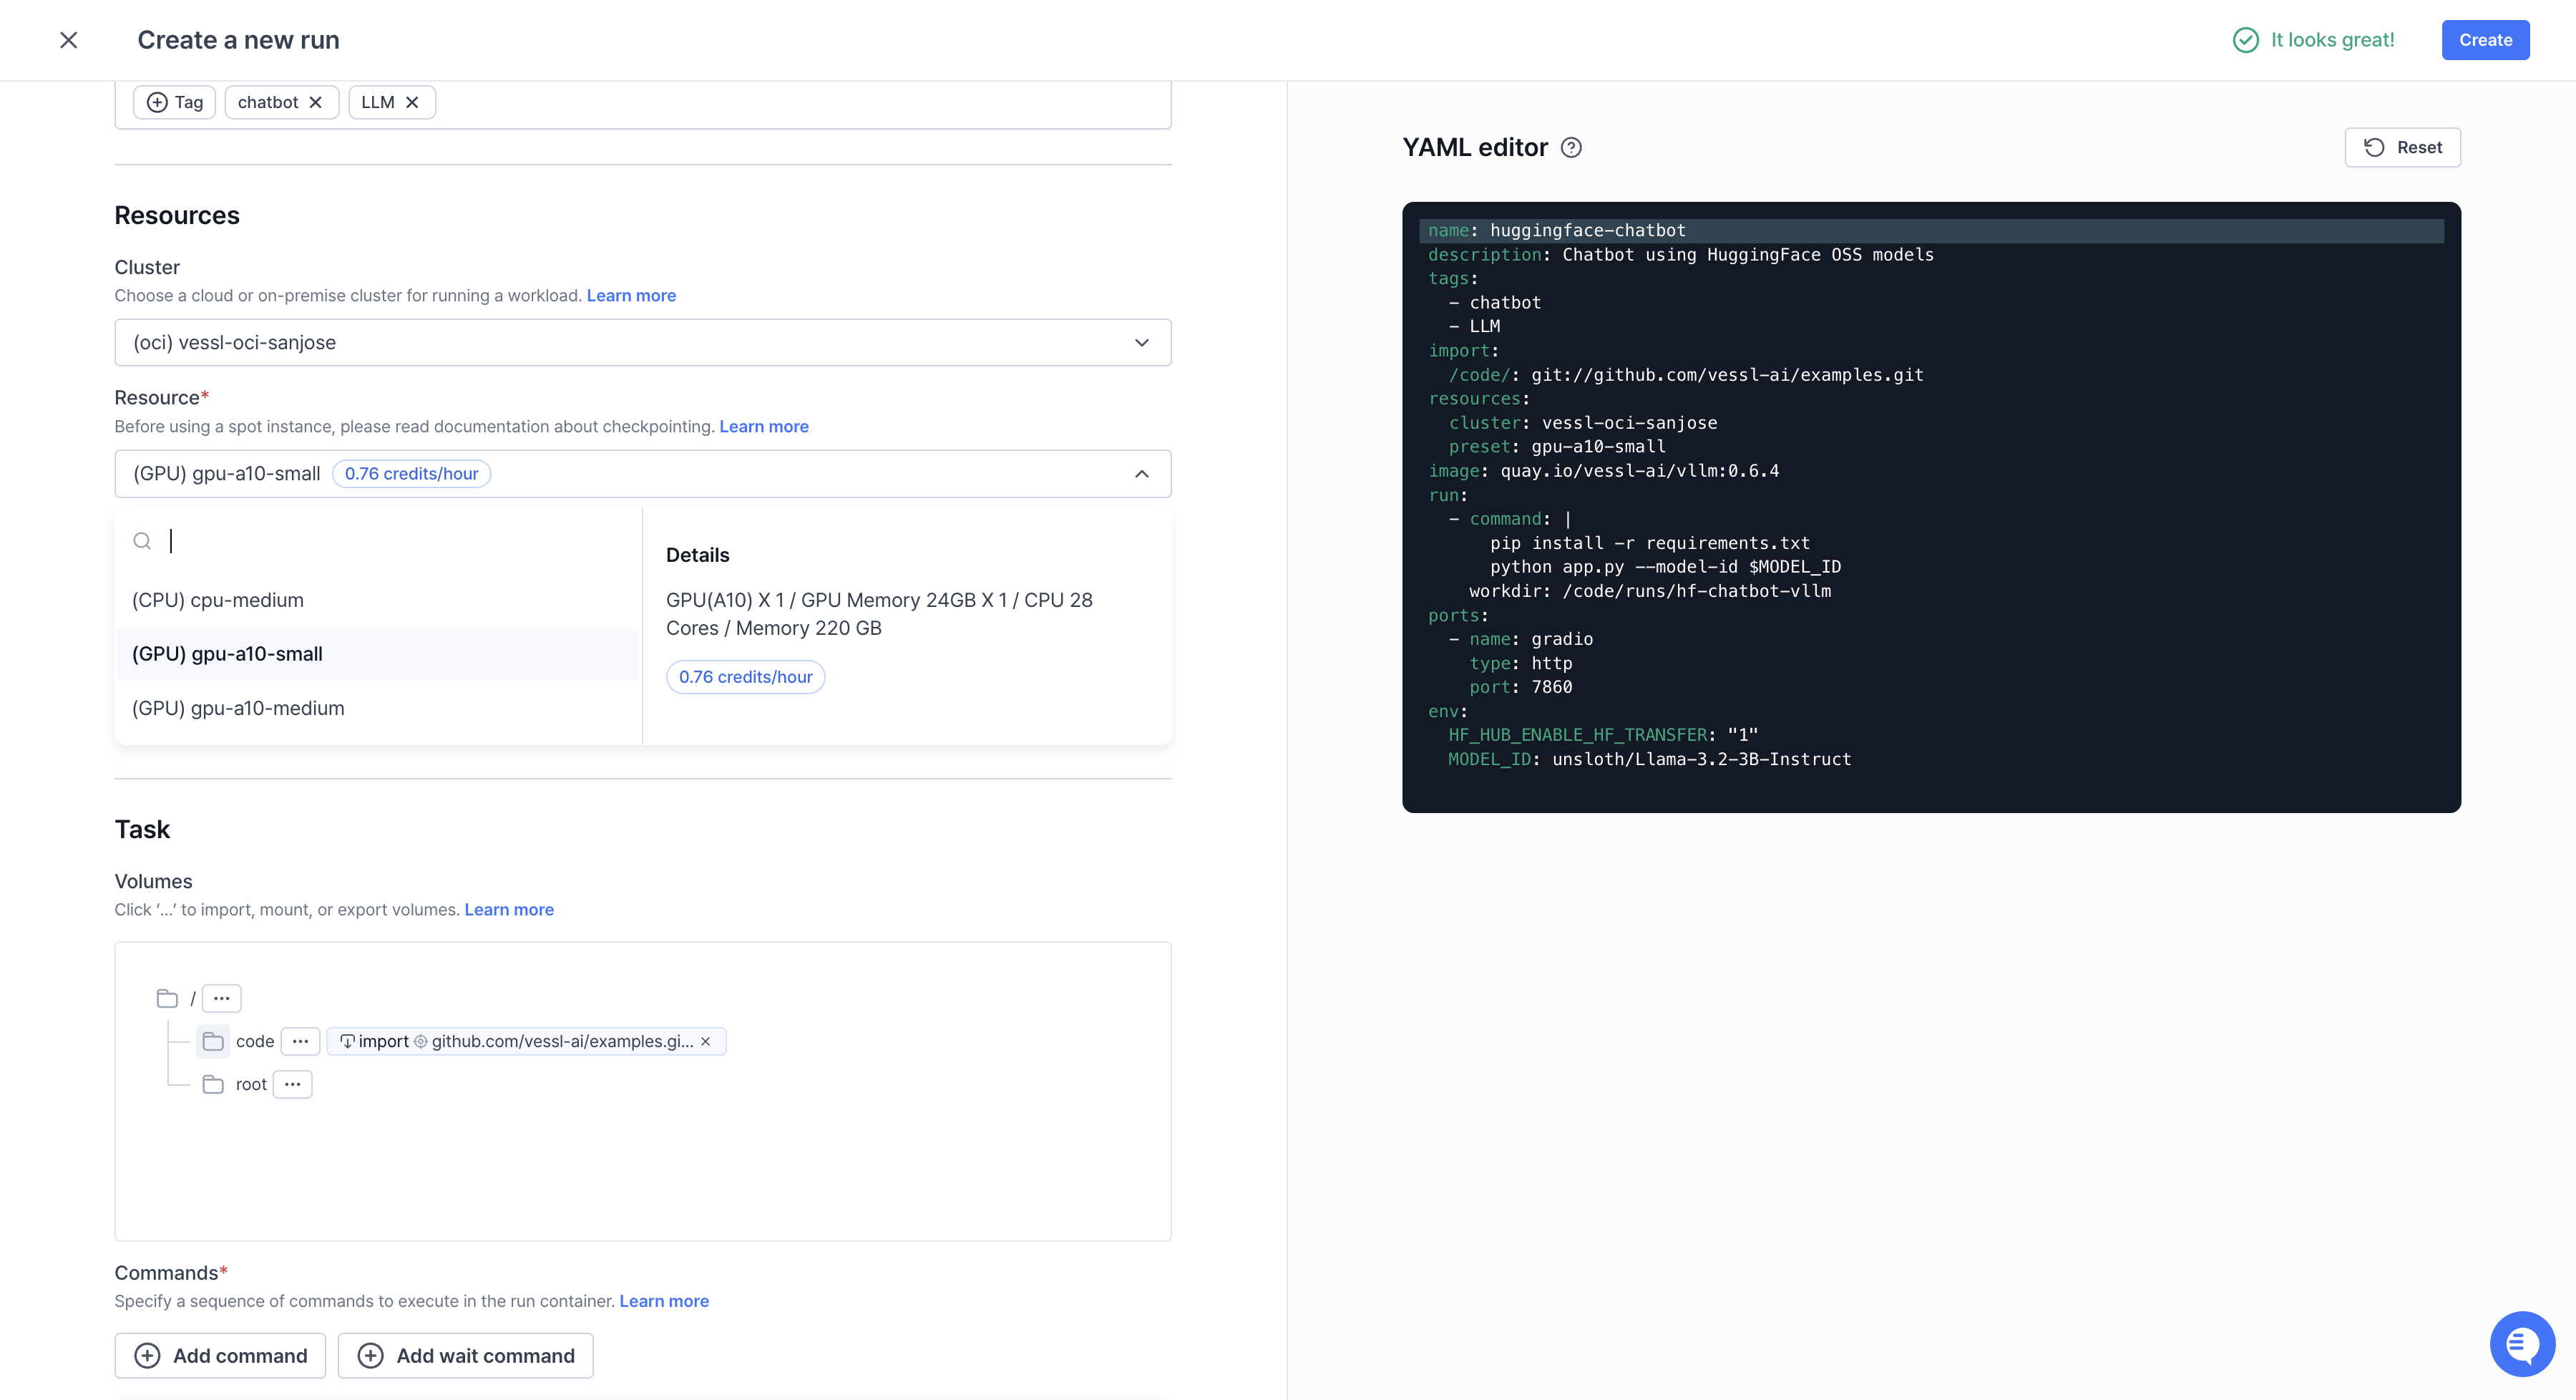 For example, when you define resource specs as described above, users will only be able to choose from the three predefined options in **Run** or **Workspace**, as shown in the image above.
These default options can help admins optimize resource usage by (1) preventing someone from occupying an excessive number of GPUs and (2) preventing unbalanced resource requests that cause skewed resource usage. As a result, average users can simply proceed their jobs without thinking and configuring the exact number of CPU cores and memories they need to request.
## Step-by-step guide
Take a quick 2-minute tour of **Resource specs** using the demo below.
For example, when you define resource specs as described above, users will only be able to choose from the three predefined options in **Run** or **Workspace**, as shown in the image above.
These default options can help admins optimize resource usage by (1) preventing someone from occupying an excessive number of GPUs and (2) preventing unbalanced resource requests that cause skewed resource usage. As a result, average users can simply proceed their jobs without thinking and configuring the exact number of CPU cores and memories they need to request.
## Step-by-step guide
Take a quick 2-minute tour of **Resource specs** using the demo below.
Click **New resource spec** and define the following parameters.
* `Name` — Set a name for the preset. Use names that well represent the preset
like `a100-2.mem-16.cpu-6`.
* `Processor type` — Define the preset by the processor type, either by CPU or
GPU.
* `CPU limit` — Enter the number of CPUs. For `a100-2.mem-16.cpu-6`, enter `6`.
* `Memory limit` — Enter the amount of memory in GB. For `a100-2.mem-16.cpu-6`,
the number would be 16.
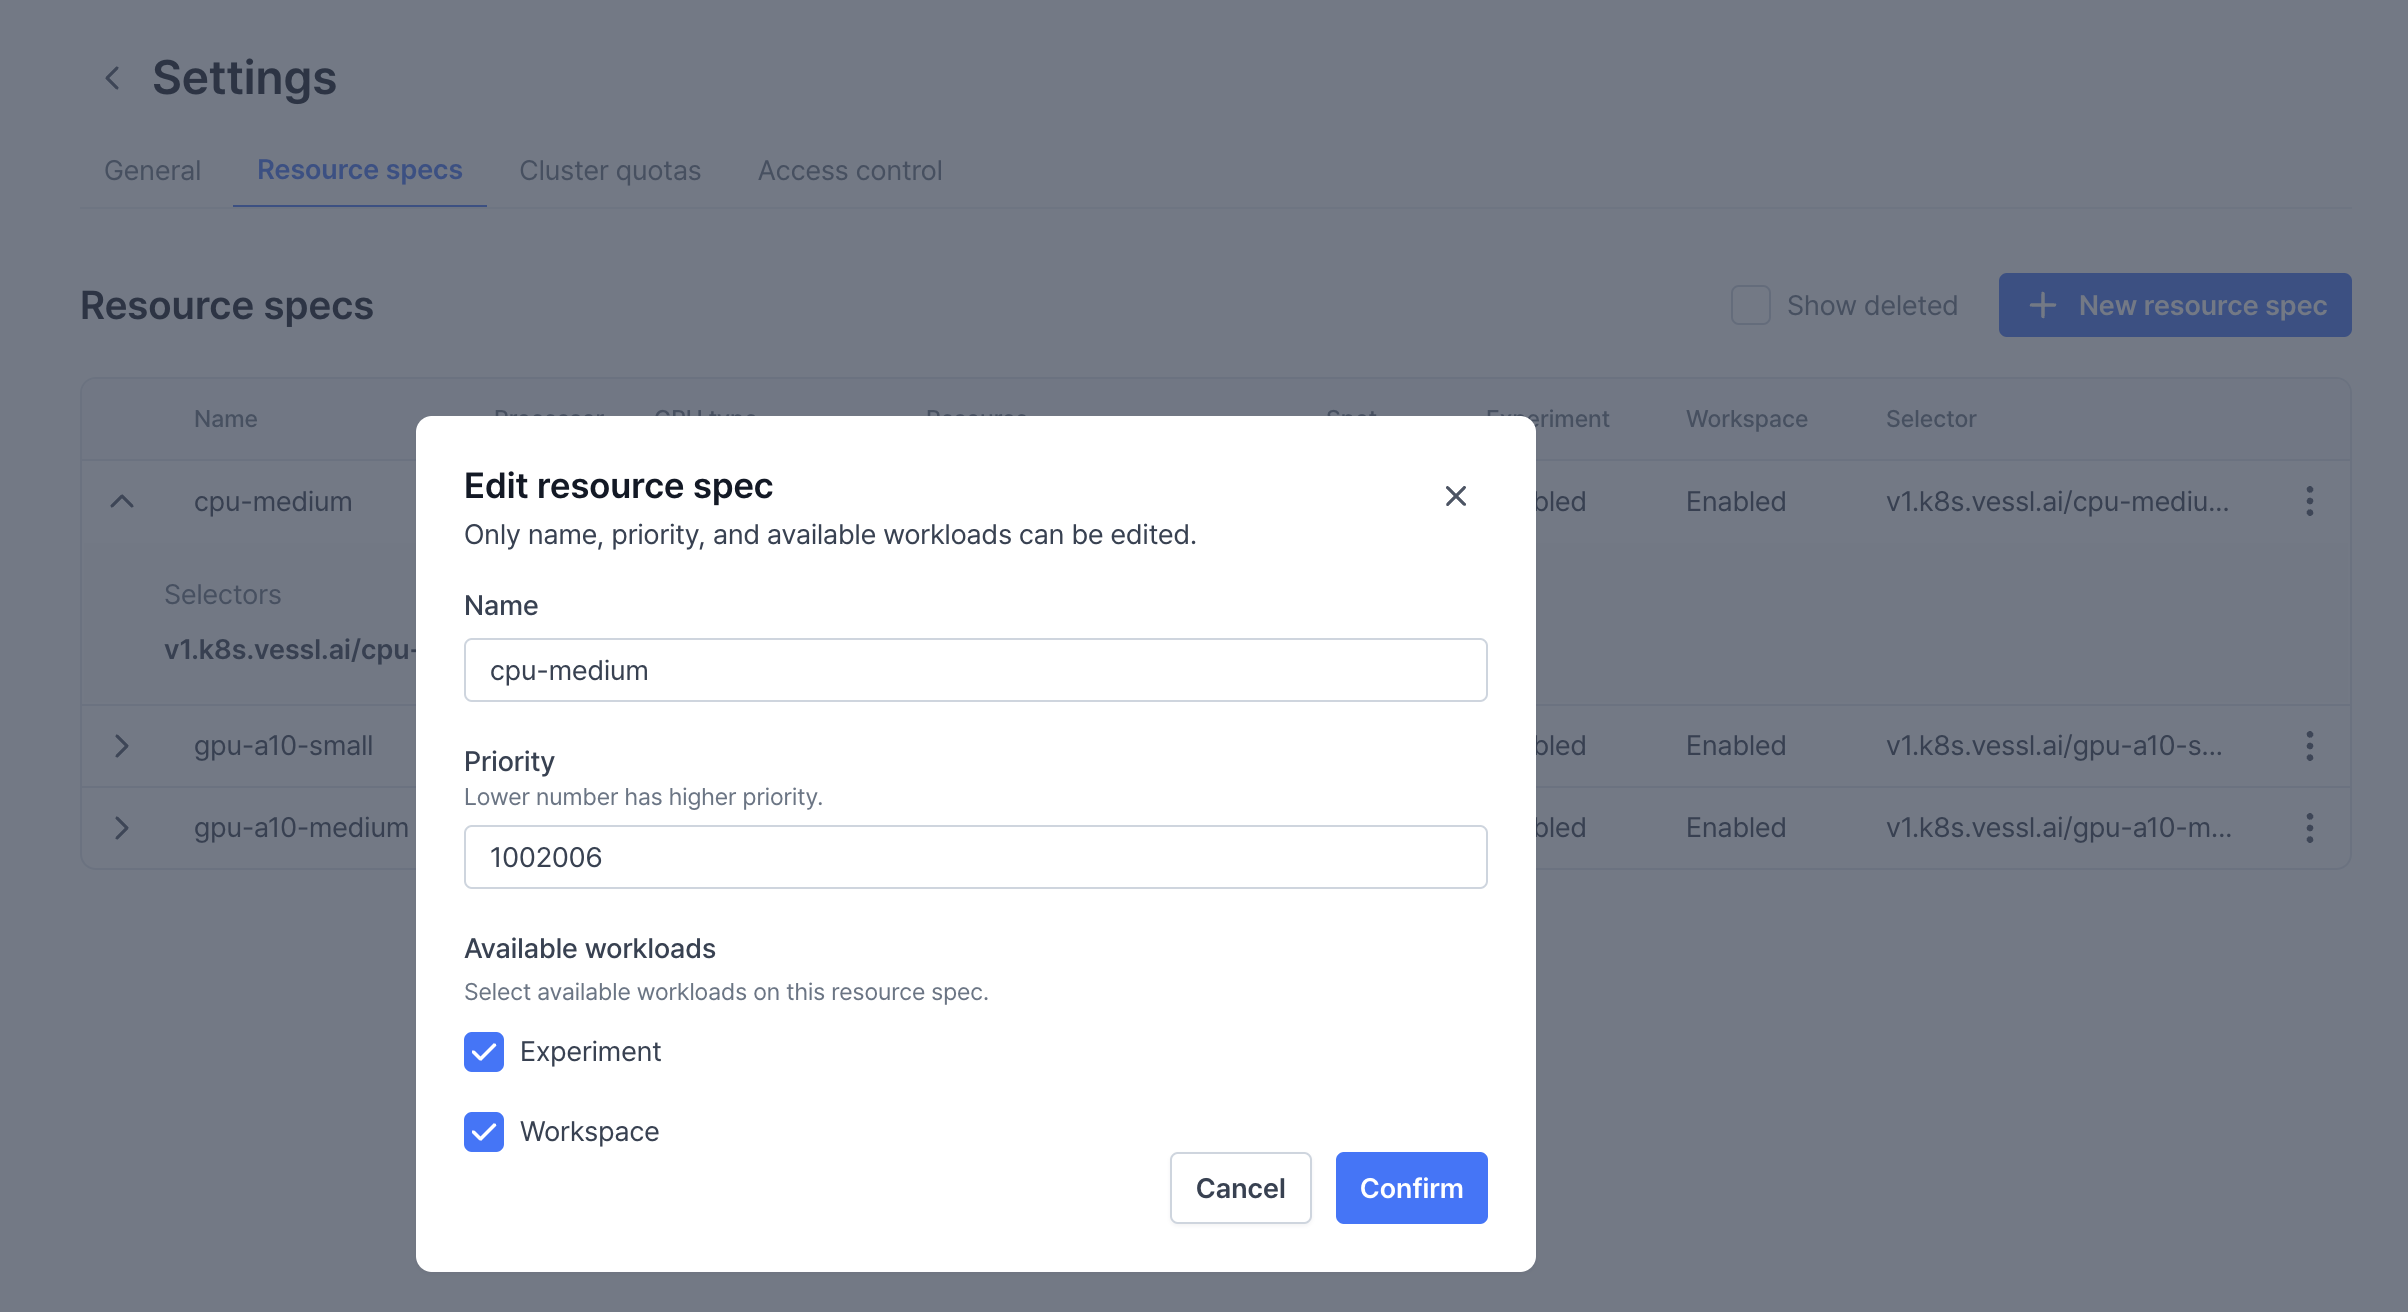 * `Priority` - Assigning different priority values disables the First In, First
Out (FIFO) scheduler and executes workloads based on their priority, with
lower priority values being processed first. In the example preset above,
workloads running on `cpu-medium` are always prioritized over workloads on
other GPUs. To view the priority assigned to each node, click the **Edit**
button under **Resource Specs**.
* `GPU type` — Specify the GPU model you are using by running the `nvidia-smi`
command on your server. In the example below, the GPU type is
`a100-sxm-80gb`.
```bash theme={null}
nvidia-smi
```
```bash theme={null}
Thu Jan 19 17:44:05 2023
+-----------------------------------------------------------------------------+
| NVIDIA-SMI 510.73.08 Driver Version: 510.73.08 CUDA Version: 11.6 |
|-------------------------------+----------------------+----------------------+
| GPU Name Persistence-M| Bus-Id Disp.A | Volatile Uncorr. ECC |
| Fan Temp Perf Pwr:Usage/Cap| Memory-Usage | GPU-Util Compute M. |
| | | MIG M. |
|===============================+======================+======================|
| 0 NVIDIA A100-SXM... On | 00000000:01:00.0 Off | 0 |
| N/A 40C P0 64W / 275W | 0MiB / 81920MiB | 0% Default |
| | | Disabled |
+-------------------------------+----------------------+----------------------+
```
* `GPU limit` — Enter the number of GPUs. For `gpu2.mem16.cpu6`, enter `2`. You
can also place decimal values if you are using Multi-Instance GPUs (MIG).
* `Available workloads` — Select the type of workloads that can use the preset.
With this, you can guide users to use **Experiment** by preventing them from
running **Workspace** with 4 or 8 GPUs.
Tolerations allow workloads to be scheduled on nodes with specific taints by
matching their conditions. They consist of two key components: **Operator** and
**Effect**. Here is an explanation of the available options:
#### Operator
* **Equal**
The Toleration is applied only if both the `Key` and `Value` match the
node's taint exactly. Example: If a node has a taint `key=value`, the
Toleration must also specify `key=value` to allow scheduling.
* **Exists**
The Toleration is applied if the `Key` exists, regardless of the `Value`.
Example: If a node has a taint with `key=anything`, the Toleration only
needs to specify `key` to allow scheduling.
***
#### Effect
* **NoExecute**
Workloads that do not tolerate this taint will be **evicted immediately**
from the node. Additionally, they cannot be scheduled onto the node.
* **NoSchedule**
Workloads that do not tolerate this taint will **not be scheduled** on the
node. However, any workloads already running on the node will remain
unaffected.
* **PreferNoSchedule**
Kubernetes will attempt to avoid scheduling workloads on nodes with this
taint if they do not have a matching Toleration. However, it is not strictly
enforced, and workloads may still be scheduled if necessary.
***
### Example use case
If you want to prevent specific workloads from running on nodes reserved for
GPU-intensive tasks:
1. Add a taint to GPU nodes, such as `key=gpu, value=true, effect=NoSchedule`.
2. Configure a Toleration for workloads requiring GPU resources, specifying
`key=gpu, value=true, operator=Equal`.
This ensures that only workloads with the proper Toleration can be scheduled
on GPU nodes, while other workloads are directed to non-GPU nodes.
***
### Key benefits
Tolerations, in conjunction with taints, offer precise control over workload scheduling, enabling sophisticated policies for workload isolation, enhanced security, and improved cluster stability during node maintenance. They also optimize resource utilization by ensuring workloads run on nodes that meet their operational requirements.
**Node Selectors** allow you to control where workloads are scheduled by
matching specific labels on nodes. They are a simple key-value mechanism used
to constrain workloads to run only on nodes that meet certain criteria.
***
#### Key and value
* **Key**
Specifies the label key on the node that the workload should match. Example:
`vessl.ai/role`
* **Value**
Specifies the corresponding value of the key. The workload will only be
scheduled on nodes where the label matches this value. Example:
`gpu-worker`
***
### How node selectors work
When you define a Node selector:
1. Kubernetes checks for nodes with matching labels (`Key=Value`).
2. Only nodes with labels that match the specified Key-Value pair will be
eligible to run the workload.
If no matching nodes are available, the workload will remain unscheduled.
***
### Example use case
If you want to schedule workloads on nodes reserved for GPU tasks:
1. Label your GPU nodes with `vessl.ai/role=gpu-worker`.
2. Set a Node Selector in the Resource Spec:
* **Key**: `vessl.ai/role`
* **Value**: `gpu-worker`
This ensures that workloads using this Resource Spec are scheduled only on GPU
nodes.
***
### Key benefits
Node Selectors help ensure that specific workloads use nodes optimized for their needs (for example, GPU vs. CPU nodes) and prevent resource conflicts by directing workloads to dedicated nodes.
* `Priority` - Assigning different priority values disables the First In, First
Out (FIFO) scheduler and executes workloads based on their priority, with
lower priority values being processed first. In the example preset above,
workloads running on `cpu-medium` are always prioritized over workloads on
other GPUs. To view the priority assigned to each node, click the **Edit**
button under **Resource Specs**.
* `GPU type` — Specify the GPU model you are using by running the `nvidia-smi`
command on your server. In the example below, the GPU type is
`a100-sxm-80gb`.
```bash theme={null}
nvidia-smi
```
```bash theme={null}
Thu Jan 19 17:44:05 2023
+-----------------------------------------------------------------------------+
| NVIDIA-SMI 510.73.08 Driver Version: 510.73.08 CUDA Version: 11.6 |
|-------------------------------+----------------------+----------------------+
| GPU Name Persistence-M| Bus-Id Disp.A | Volatile Uncorr. ECC |
| Fan Temp Perf Pwr:Usage/Cap| Memory-Usage | GPU-Util Compute M. |
| | | MIG M. |
|===============================+======================+======================|
| 0 NVIDIA A100-SXM... On | 00000000:01:00.0 Off | 0 |
| N/A 40C P0 64W / 275W | 0MiB / 81920MiB | 0% Default |
| | | Disabled |
+-------------------------------+----------------------+----------------------+
```
* `GPU limit` — Enter the number of GPUs. For `gpu2.mem16.cpu6`, enter `2`. You
can also place decimal values if you are using Multi-Instance GPUs (MIG).
* `Available workloads` — Select the type of workloads that can use the preset.
With this, you can guide users to use **Experiment** by preventing them from
running **Workspace** with 4 or 8 GPUs.
Tolerations allow workloads to be scheduled on nodes with specific taints by
matching their conditions. They consist of two key components: **Operator** and
**Effect**. Here is an explanation of the available options:
#### Operator
* **Equal**
The Toleration is applied only if both the `Key` and `Value` match the
node's taint exactly. Example: If a node has a taint `key=value`, the
Toleration must also specify `key=value` to allow scheduling.
* **Exists**
The Toleration is applied if the `Key` exists, regardless of the `Value`.
Example: If a node has a taint with `key=anything`, the Toleration only
needs to specify `key` to allow scheduling.
***
#### Effect
* **NoExecute**
Workloads that do not tolerate this taint will be **evicted immediately**
from the node. Additionally, they cannot be scheduled onto the node.
* **NoSchedule**
Workloads that do not tolerate this taint will **not be scheduled** on the
node. However, any workloads already running on the node will remain
unaffected.
* **PreferNoSchedule**
Kubernetes will attempt to avoid scheduling workloads on nodes with this
taint if they do not have a matching Toleration. However, it is not strictly
enforced, and workloads may still be scheduled if necessary.
***
### Example use case
If you want to prevent specific workloads from running on nodes reserved for
GPU-intensive tasks:
1. Add a taint to GPU nodes, such as `key=gpu, value=true, effect=NoSchedule`.
2. Configure a Toleration for workloads requiring GPU resources, specifying
`key=gpu, value=true, operator=Equal`.
This ensures that only workloads with the proper Toleration can be scheduled
on GPU nodes, while other workloads are directed to non-GPU nodes.
***
### Key benefits
Tolerations, in conjunction with taints, offer precise control over workload scheduling, enabling sophisticated policies for workload isolation, enhanced security, and improved cluster stability during node maintenance. They also optimize resource utilization by ensuring workloads run on nodes that meet their operational requirements.
**Node Selectors** allow you to control where workloads are scheduled by
matching specific labels on nodes. They are a simple key-value mechanism used
to constrain workloads to run only on nodes that meet certain criteria.
***
#### Key and value
* **Key**
Specifies the label key on the node that the workload should match. Example:
`vessl.ai/role`
* **Value**
Specifies the corresponding value of the key. The workload will only be
scheduled on nodes where the label matches this value. Example:
`gpu-worker`
***
### How node selectors work
When you define a Node selector:
1. Kubernetes checks for nodes with matching labels (`Key=Value`).
2. Only nodes with labels that match the specified Key-Value pair will be
eligible to run the workload.
If no matching nodes are available, the workload will remain unscheduled.
***
### Example use case
If you want to schedule workloads on nodes reserved for GPU tasks:
1. Label your GPU nodes with `vessl.ai/role=gpu-worker`.
2. Set a Node Selector in the Resource Spec:
* **Key**: `vessl.ai/role`
* **Value**: `gpu-worker`
This ensures that workloads using this Resource Spec are scheduled only on GPU
nodes.
***
### Key benefits
Node Selectors help ensure that specific workloads use nodes optimized for their needs (for example, GPU vs. CPU nodes) and prevent resource conflicts by directing workloads to dedicated nodes.