> ## Documentation Index
> Fetch the complete documentation index at: https://docs.vessl.ai/llms.txt
> Use this file to discover all available pages before exploring further.
# On-premises clusters
## Introduction
Do you have knowledge of Kubernetes and DevOps, and available GPU resources, but find it challenging to manage these resources?
If so, you can install and manage VESSL directly on your resources. By using scripts provided by VESSL AI, you can register clusters and utilize VESSL's powerful MLOps features on your computing resources.
## Before you begin
Ensure you have the following prerequisites. This guide provides generic instructions for Linux distributions based on Ubuntu 22.04.
* Ubuntu 20.04, CentOS 7.9 or above.
* At least 2 GB of RAM per machine.
* At least 2 CPUs per machine.
* At least 500 GB of storage or more.
* Python 3.8 or above is installed.
* [Helm](https://helm.sh/docs/intro/install/) is installed.
* Full network connectivity between all machines in the cluster (public or private network).
* Unique hostname, MAC address, and product\_uuid for every node. See [here](https://kubernetes.io/docs/setup/production-environment/tools/kubeadm/install-kubeadm/#verify-mac-address) for more details.
* Ensure the machine’s hostname is in lowercase.
* Certain ports must be open on your machines. See [here](https://docs.k0sproject.io/stable/networking/#required-ports-and-protocols) for more details.
* We recommend that all nodes have static IP addresses, regardless of whether they are on a public or private network.
* Make sure you have active VESSL accounts and organization setup.
* Your VESSL account must have admin privileges in the organization.
## Step-by-step Guide
### Install GPU-relative Components
If your nodes have NVIDIA GPUs, you need to install the following programs on all GPU nodes that you want to connect to the cluster.
If a node does not have a GPU, you can skip this process.
Follow [this document](https://ubuntu.com/server/docs/nvidia-drivers-installation) to install the latest version of the NVIDIA graphics driver on your node.
Follow [this document](https://docs.nvidia.com/datacenter/cloud-native/container-toolkit/latest/install-guide.html#installing-with-apt) to install the latest version of the nvidia-container-runtime on your node.
```bash theme={null}
sudo apt-get install nvidia-cuda-toolkit
```
### Setup Control Plane Node
First, download the script on the node you want to use to manage your cluster (referred to as the [control plane](https://kubernetes.io/docs/concepts/overview/components/#control-plane-components) in Kubernetes).
```bash theme={null}
curl -sSLf https://install.vessl.ai/bootstrap-cluster/bootstrap-cluster.sh > bootstrap-cluster.sh
chmod +x bootstrap-cluster.sh
```
This script includes everything needed to install k0s and its dependencies for setting up an on-premises cluster. If you are familiar with k0s and bash scripts, you can modify the script to suit your desired configuration.
To designate this node as the control plane and proceed with the Kubernetes cluster installation, run the following command:
```bash theme={null}
./bootstrap-cluster.sh --role=controller
```
After completing the installation, you will receive a token similar to the one shown in the screenshot. Copy and save this token.
 #### Advanced: Taint Control Plane Node
By default, VESSL's workloads are also deployed on the control plane. However, if you do not need to allocate Machine Learning workloads to the control plane node due to resource constraints or for ease of management, you can prevent workload allocation by using the following command during installation:
```bash theme={null}
./bootstrap-cluster.sh --role=controller --taint-controller
```
#### Advanced: Select a Specific Kubernetes version
```bash theme={null}
./bootstrap-cluster.sh --role=controller --k0s-version=v1.30.1+k0s.0
```
It is recommended not to downgrade to a Kubernetes version earlier than 1.24 unless you are well-informed about the implications.
There are additional script options available. Use the --help option to see all configurable parameters.
```bash theme={null}
./bootstrap-cluster.sh --help
```
### Verify Control Plane Setup
To verify that the installation was successful and that the pods are running correctly, enter the following commands:
It may take some time for the nodes and pods to be properly deployed. After a short wait, check the node configuration by entering:
```bash theme={null}
sudo k0s kubectl get nodes
```
#### Advanced: Taint Control Plane Node
By default, VESSL's workloads are also deployed on the control plane. However, if you do not need to allocate Machine Learning workloads to the control plane node due to resource constraints or for ease of management, you can prevent workload allocation by using the following command during installation:
```bash theme={null}
./bootstrap-cluster.sh --role=controller --taint-controller
```
#### Advanced: Select a Specific Kubernetes version
```bash theme={null}
./bootstrap-cluster.sh --role=controller --k0s-version=v1.30.1+k0s.0
```
It is recommended not to downgrade to a Kubernetes version earlier than 1.24 unless you are well-informed about the implications.
There are additional script options available. Use the --help option to see all configurable parameters.
```bash theme={null}
./bootstrap-cluster.sh --help
```
### Verify Control Plane Setup
To verify that the installation was successful and that the pods are running correctly, enter the following commands:
It may take some time for the nodes and pods to be properly deployed. After a short wait, check the node configuration by entering:
```bash theme={null}
sudo k0s kubectl get nodes
```
 To check the status of all pods across all namespaces, use the following command:
```bash theme={null}
sudo k0s kubectl get pods -A
```
To check the status of all pods across all namespaces, use the following command:
```bash theme={null}
sudo k0s kubectl get pods -A
```
 These commands will help you ensure that the nodes and pods are correctly configured and running as expected.
### Setup Worker Node
After completing the Control Plane setup, you can configure the worker nodes using the command issued during the Control Plane setup. Execute the following command on the worker node you want to connect:
```bash theme={null}
curl -sSLf https://install.vessl.ai/bootstrap-cluster/bootstrap-cluster.sh | sudo bash -s -- --role=worker --token="[TOKEN_FROM_CONTROLLER_HERE]"
```
Replace `[TOKEN_FROM_CONTROLLER_HERE]` with the actual token you received from the Control Plane setup.
### Create VESSL Cluster
The VESSL cluster setup is performed on the Control Plane node.
If the VESSL CLI is not already installed, use the following command to install it:
```bash theme={null}
pip install vessl --upgrade
```
After installation, configure the VESSL CLI:
```bash theme={null}
vessl configure
```
Once the VESSL CLI is configured, create a new VESSL Cluster with the following command:
```bash theme={null}
vessl cluster create
```
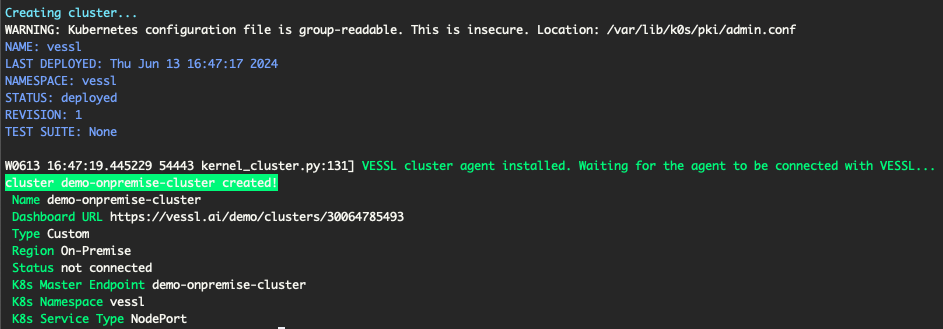
Follow the prompts to configure your cluster options. You can press Enter to use the default values. If cluster is created, you will see a success message.
These commands will help you ensure that the nodes and pods are correctly configured and running as expected.
### Setup Worker Node
After completing the Control Plane setup, you can configure the worker nodes using the command issued during the Control Plane setup. Execute the following command on the worker node you want to connect:
```bash theme={null}
curl -sSLf https://install.vessl.ai/bootstrap-cluster/bootstrap-cluster.sh | sudo bash -s -- --role=worker --token="[TOKEN_FROM_CONTROLLER_HERE]"
```
Replace `[TOKEN_FROM_CONTROLLER_HERE]` with the actual token you received from the Control Plane setup.
### Create VESSL Cluster
The VESSL cluster setup is performed on the Control Plane node.
If the VESSL CLI is not already installed, use the following command to install it:
```bash theme={null}
pip install vessl --upgrade
```
After installation, configure the VESSL CLI:
```bash theme={null}
vessl configure
```
Once the VESSL CLI is configured, create a new VESSL Cluster with the following command:
```bash theme={null}
vessl cluster create
```
Follow the prompts to configure your cluster options. You can press Enter to use the default values. If cluster is created, you will see a success message.
 ### Confirm VESSL Cluster integration
To verify that the VESSL Cluster is properly integrated with your organization, run the following command:
```bash theme={null}
vessl cluster list
```
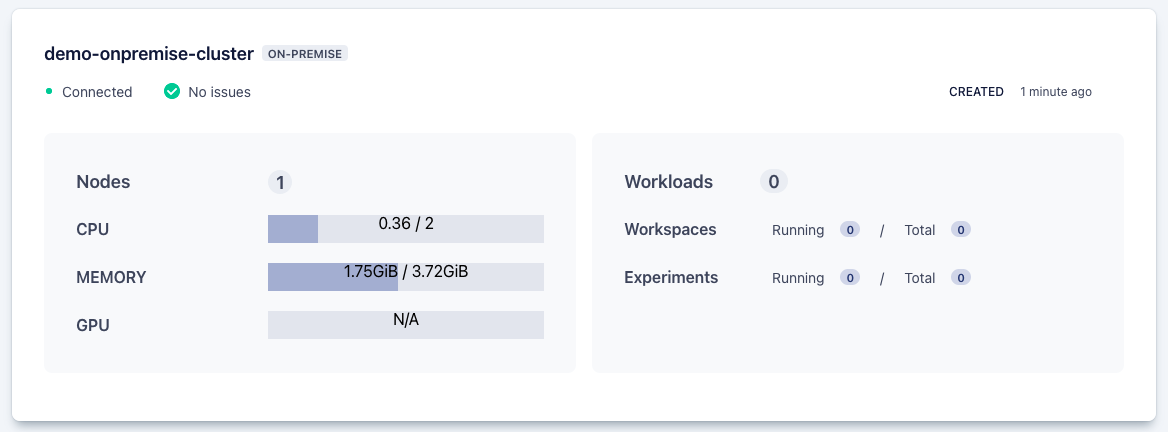
Additionally, you can check the status of the integrated cluster by navigating to the Web UI. Go to the Organization tab and then select the Cluster tab. You should see the current status of the connected cluster displayed.
### Confirm VESSL Cluster integration
To verify that the VESSL Cluster is properly integrated with your organization, run the following command:
```bash theme={null}
vessl cluster list
```
Additionally, you can check the status of the integrated cluster by navigating to the Web UI. Go to the Organization tab and then select the Cluster tab. You should see the current status of the connected cluster displayed.
 ## Limitation
Some features of VESSL are not available or guaranteed to work on your on-premises cluster. The following functionalities have limitations:
### VESSL Run
1. Custom Resource Specs in YAML
* You cannot set custom resource specifications directly using YAML.
* For example, setting CPU, GPU, or memory directly in YAML is not supported.
* To use YAML for your VESSL Run, you must create a [Resource Spec](/guides/clusters/specs) for your on-premises cluster.
### VESSL Service
1. Provisioned Mode
* You cannot create a VESSL Service in Provisioned mode on your on-premises cluster.
## Frequently Asked questions
### How can VESSL support on-premises clusters?
VESSL provides a set of scripts that help you install and manage Kubernetes clusters using [k0s](https://k0sproject.io/) on your on-premises resources. By using these scripts, you can register clusters and utilize VESSL's powerful MLOps features on your computing resources.
### How can I get token from the control plane node again?
You can create a new token by running the following command on the control plane node:
```bash theme={null}
sudo k0s token create
```
### Do we need CRI (docker or containerd) for Kubernetes?
k0s contains the required CRI for the Kubernetes cluster, so you don't need to install it directly. For more information, you can find it [here](https://docs.k0sproject.io/stable/runtime/).
### Bootstrap script failed when setting the node
If the bootstrap script fails during node setup, verify the network configuration and ensure all prerequisites are met. Check the logs for specific error messages to diagnose the issue.
### Bootstrap script succeeded, but k8s pods are failed
If the bootstrap script succeeds but Kubernetes pods fail, check the pod logs for errors. Common issues include network misconfigurations, insufficient resources, or missing dependencies.
### How can I uninstall k0s?
To uninstall k0s, follow these steps:
```bash theme={null}
sudo k0s stop
sudo k0s reset
```
```bash theme={null}
sudo reboot
```
If the k0s stop or k0s reset command hangs, manually remove the k0s components:
```bash theme={null}
systemctl stop k0scontroller # k0sworker for worker nodes
systemctl disable k0scontroller # k0sworker for worker nodes
systemctl daemon-reload
systemctl reset-failed
rm /etc/systemd/system/k0scontroller.service # k0sworker.service for worker nodes
rm -rf /run/k0s
rm -rf /var/lib/k0s
rm -rf /opt/vessl/k0s
rm /etc/k0s/containerd.toml
touch /etc/k0s/containerd.toml
rm /usr/local/bin/k0s
ip link delete vxlan.calico
```
### How can I allocate static IP to nodes?
To allocate static IPs to nodes, modify the bootstrap script as follows:
```bash theme={null}
curl -sSLf https://install.vessl.ai/bootstrap-cluster/bootstrap-cluster.sh > bootstrap-cluster.sh
chmod +x bootstrap-cluster.sh
```
In the run\_k0s\_controller\_daemon() function, add `--enable-k0s-cloud-provider=true`:
```bash theme={null}
sudo $K0S_EXECUTABLE install controller -c $K0S_CONFIG_PATH/k0s.yaml \
${no_taint_option:+"--no-taints"} \
--enable-worker \
--enable-k0s-cloud-provider=true \ ## Add argument here
"$CRI_SOCKET_OPTION" \
"$KUBELET_EXTRA_ARGS"
```
In the run\_k0s\_worker\_daemon() function, add `--enable-cloud-provider=true`:
```bash theme={null}
sudo $K0S_EXECUTABLE install worker -c $K0S_CONFIG_PATH/k0s.yaml \
--enable-cloud-provider=true \ ## Add argument here
"$CRI_SOCKET_OPTION" \
"$KUBELET_EXTRA_ARGS"
```
Execute the script on all controller nodes and worker nodes.
On the control plane node, run the following command:
```bash theme={null}
k0s kubectl annotate \
node \
k0sproject.io/node-ip-external=
```
For more detailed information, refer to the [k0s documentation](https://docs.k0sproject.io/head/cloud-providers/#deploy-the-cloud-provider).
### How can I remove the VESSL cluster from the organization?
If you need to delete the on-premises cluster due to issues or because it is no longer needed, follow these steps:
```bash theme={null}
sudo k0s stop
sudo k0s reset
sudo reboot
```
Navigate to the Web UI and delete the created cluster from the organization.
## Limitation
Some features of VESSL are not available or guaranteed to work on your on-premises cluster. The following functionalities have limitations:
### VESSL Run
1. Custom Resource Specs in YAML
* You cannot set custom resource specifications directly using YAML.
* For example, setting CPU, GPU, or memory directly in YAML is not supported.
* To use YAML for your VESSL Run, you must create a [Resource Spec](/guides/clusters/specs) for your on-premises cluster.
### VESSL Service
1. Provisioned Mode
* You cannot create a VESSL Service in Provisioned mode on your on-premises cluster.
## Frequently Asked questions
### How can VESSL support on-premises clusters?
VESSL provides a set of scripts that help you install and manage Kubernetes clusters using [k0s](https://k0sproject.io/) on your on-premises resources. By using these scripts, you can register clusters and utilize VESSL's powerful MLOps features on your computing resources.
### How can I get token from the control plane node again?
You can create a new token by running the following command on the control plane node:
```bash theme={null}
sudo k0s token create
```
### Do we need CRI (docker or containerd) for Kubernetes?
k0s contains the required CRI for the Kubernetes cluster, so you don't need to install it directly. For more information, you can find it [here](https://docs.k0sproject.io/stable/runtime/).
### Bootstrap script failed when setting the node
If the bootstrap script fails during node setup, verify the network configuration and ensure all prerequisites are met. Check the logs for specific error messages to diagnose the issue.
### Bootstrap script succeeded, but k8s pods are failed
If the bootstrap script succeeds but Kubernetes pods fail, check the pod logs for errors. Common issues include network misconfigurations, insufficient resources, or missing dependencies.
### How can I uninstall k0s?
To uninstall k0s, follow these steps:
```bash theme={null}
sudo k0s stop
sudo k0s reset
```
```bash theme={null}
sudo reboot
```
If the k0s stop or k0s reset command hangs, manually remove the k0s components:
```bash theme={null}
systemctl stop k0scontroller # k0sworker for worker nodes
systemctl disable k0scontroller # k0sworker for worker nodes
systemctl daemon-reload
systemctl reset-failed
rm /etc/systemd/system/k0scontroller.service # k0sworker.service for worker nodes
rm -rf /run/k0s
rm -rf /var/lib/k0s
rm -rf /opt/vessl/k0s
rm /etc/k0s/containerd.toml
touch /etc/k0s/containerd.toml
rm /usr/local/bin/k0s
ip link delete vxlan.calico
```
### How can I allocate static IP to nodes?
To allocate static IPs to nodes, modify the bootstrap script as follows:
```bash theme={null}
curl -sSLf https://install.vessl.ai/bootstrap-cluster/bootstrap-cluster.sh > bootstrap-cluster.sh
chmod +x bootstrap-cluster.sh
```
In the run\_k0s\_controller\_daemon() function, add `--enable-k0s-cloud-provider=true`:
```bash theme={null}
sudo $K0S_EXECUTABLE install controller -c $K0S_CONFIG_PATH/k0s.yaml \
${no_taint_option:+"--no-taints"} \
--enable-worker \
--enable-k0s-cloud-provider=true \ ## Add argument here
"$CRI_SOCKET_OPTION" \
"$KUBELET_EXTRA_ARGS"
```
In the run\_k0s\_worker\_daemon() function, add `--enable-cloud-provider=true`:
```bash theme={null}
sudo $K0S_EXECUTABLE install worker -c $K0S_CONFIG_PATH/k0s.yaml \
--enable-cloud-provider=true \ ## Add argument here
"$CRI_SOCKET_OPTION" \
"$KUBELET_EXTRA_ARGS"
```
Execute the script on all controller nodes and worker nodes.
On the control plane node, run the following command:
```bash theme={null}
k0s kubectl annotate \
node \
k0sproject.io/node-ip-external=
```
For more detailed information, refer to the [k0s documentation](https://docs.k0sproject.io/head/cloud-providers/#deploy-the-cloud-provider).
### How can I remove the VESSL cluster from the organization?
If you need to delete the on-premises cluster due to issues or because it is no longer needed, follow these steps:
```bash theme={null}
sudo k0s stop
sudo k0s reset
sudo reboot
```
Navigate to the Web UI and delete the created cluster from the organization.
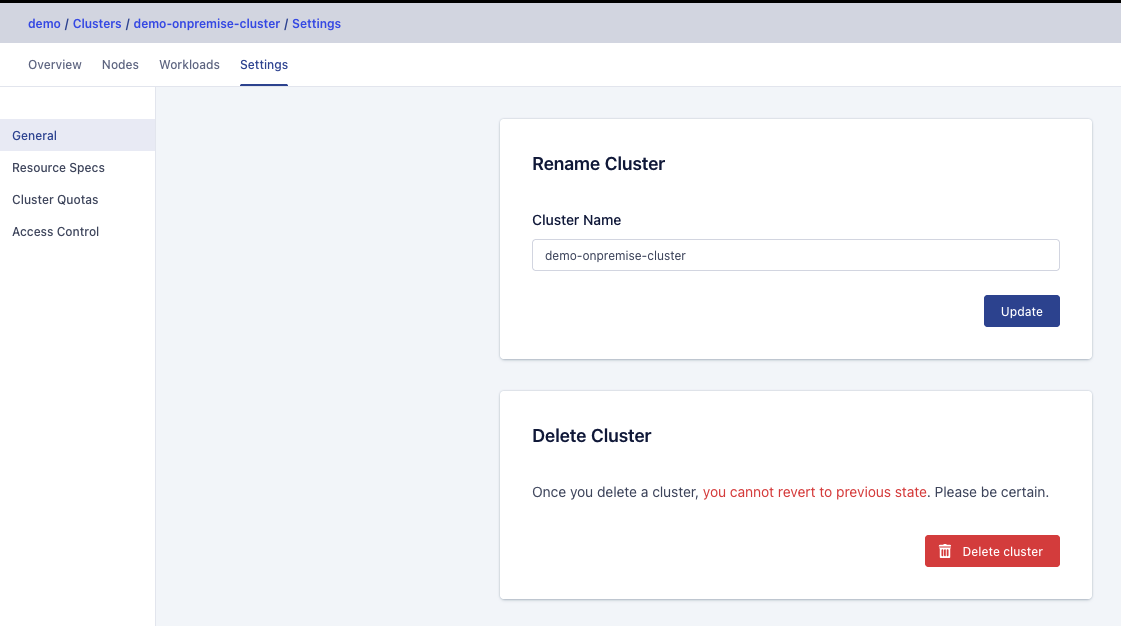 You can also delete the cluster using the CLI. Execute the following command:
```bash theme={null}
vessl cluster delete
```
Replace cluster-name with the name of the cluster you wish to delete.
### The Network Interface has changed. What do we do?
If your network interface or IP address changes, you need to reset and reconfigure k0s.
```bash theme={null}
sudo k0s stop
sudo k0s reset
```
If the control plane's network interface changes, you must reconfigure the control plane and all worker nodes.
```bash theme={null}
sudo reboot
```
After resetting, follow the setup instructions again to re-establish the network configuration for both control plane and worker nodes.
## Troubleshooting
### VESSL Flare
If you encounter issues while setting up the on-premises cluster or while using an already set up on-premises cluster, you can get assistance from VESSL Flare.
Click the link below to learn how to use VESSL Flare:
Collects all of the node’s configuration and writes them to an archive file.
### Support
For additional support, you have the following options:
* General Support: Use Hubspot or send an email to [support@vessl.ai](mailto:support@vessl.ai).
* Professional Support: If you require professional support, contact [sales@vessl.ai](mailto:sales@vessl.ai) for a dedicated support channel.
You can also delete the cluster using the CLI. Execute the following command:
```bash theme={null}
vessl cluster delete
```
Replace cluster-name with the name of the cluster you wish to delete.
### The Network Interface has changed. What do we do?
If your network interface or IP address changes, you need to reset and reconfigure k0s.
```bash theme={null}
sudo k0s stop
sudo k0s reset
```
If the control plane's network interface changes, you must reconfigure the control plane and all worker nodes.
```bash theme={null}
sudo reboot
```
After resetting, follow the setup instructions again to re-establish the network configuration for both control plane and worker nodes.
## Troubleshooting
### VESSL Flare
If you encounter issues while setting up the on-premises cluster or while using an already set up on-premises cluster, you can get assistance from VESSL Flare.
Click the link below to learn how to use VESSL Flare:
Collects all of the node’s configuration and writes them to an archive file.
### Support
For additional support, you have the following options:
* General Support: Use Hubspot or send an email to [support@vessl.ai](mailto:support@vessl.ai).
* Professional Support: If you require professional support, contact [sales@vessl.ai](mailto:sales@vessl.ai) for a dedicated support channel.